


So shortly before I finished the Invictor I completed my first Forgeword unit, the Deredeo Dreadnought with Anvilus Autocannon and Aiolos Missile Launcher (that’s a lot of dakka). This project was interesting because I decided to paint this unit in the colors of the Deathwing which is a paint scheme consisting of a bone colored armor with green accents and also something I have never done before.
I have never painted the Deathwing scheme before because I didn’t have a reason to; my army doesn’t have any Deathwing units in it such as Deathwing Knights or terminators. So before I started slapping paint on any models I had to do some research first to remedy my ignorance.

The Deathwing paint scheme seams fairly simple, the majority of the armor is a light bone color with sepia/brown shadows and recess shading. In fact the colors for the armor are similar to what is done for parchment. Many of the icons such as the aquila or chapter symbol are in a desaturated red or green color. The weapons are painted exactly like the ones for Greenwing marines so that part is pretty easy.
But before I can paint the dreadnought I had to assemble it which was a challenge in itself. There was a lot of clean up to do in terms of flashing and mold lines, not to mention the milliput work and filing to fix mold slips on several parts of the model. This wasn’t very surprising though as this is par for the course for older Forgeworld models. Once the parts were cleaned up I set up the model in sub-assemblies so that I could reach areas that would normally be hard to reach otherwise if the model was fully assembled.
Once the model was assembled I primed it black followed up with a white targeted highlight using Daler Rowny white ink. With all the prepwork done I used the airbrush to lay down a layer of Instar Golden Brown which is nearly identical to Citadel Zandri dust. Then I put down a layer of Instar Dust brown as a highlight making sure to leave some of that Golden Brown behind as shadows where appropriate. The knee plates were kept separate and I used the airbrush to paint them the same green progression I use for my Greenwing marines.
Once the airbrush work was done I moved on to using a brush to lay down the other basecoats. Laying down the metallic basecoat of Scale 75 Black Metal took the longest time because it covers both weapon arms, the chest guns and the inner frame of the legs which is a lot of area to cover. Once that was done I used Mephiston Red from Citadel for the body of the Anvilus Autocannons. At this point I used Nuln oil thinned with Lahmian Medium all over the metallic section and the red body of the weapons. In order to brighten up the weapon arms I reapplied the Mephiston Red making sure to leave the Nuln oil in the recess. I then edge highlighted the weapon arms with Evil Suns Scarlet to finish them off.
At this point I realized I needed to break up the monotony of the bone armor more because it looked too monotone and so ubiquitous. So I painted Scale 75 Misfits green on the front section of the Missile Launcher and then used the airbrush to highlight it using the same colors I did for the knee armor. Continuing with the Missile Launcher I based the front plate where the missiles were with black and then painted the missile cones in Khorne red with a highlight on the tips of Mephiston Red.
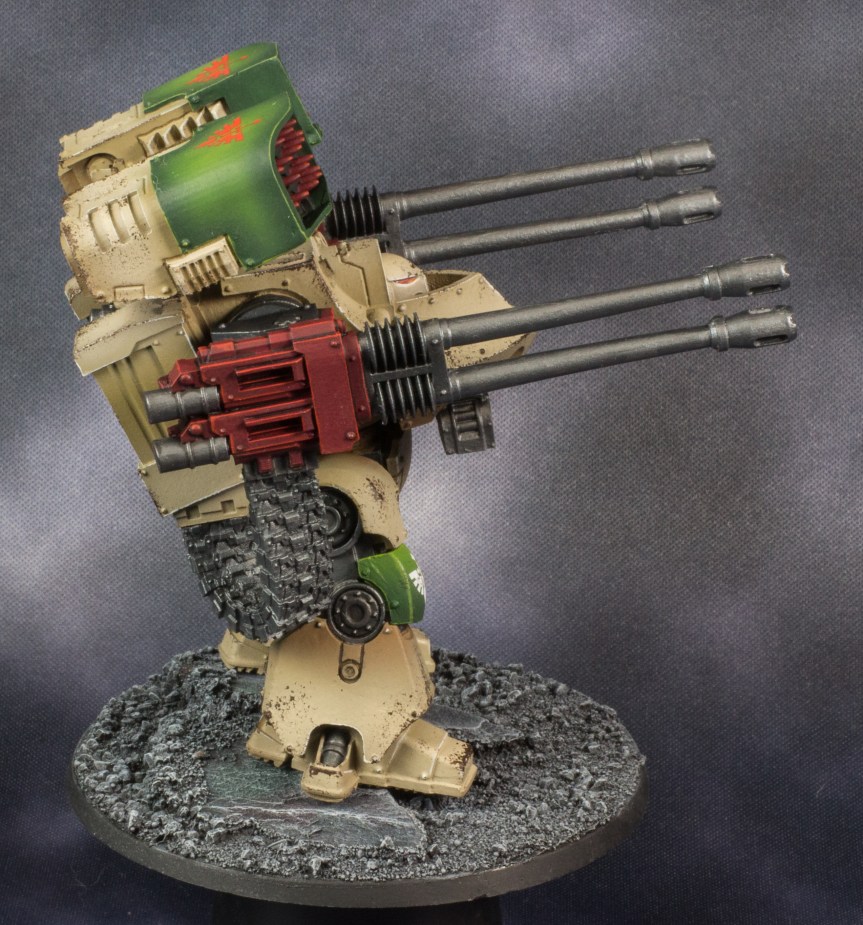
Returning to the bone armor I applied an edge highlight using VMC Ivory on all the panels and a dot highlight on all the rivets. For the eyes I based them in Mephiston red and then used VMC orange fire in the front as a first highlight and then Citadel Yriel Yellow as a smaller highlight within the orange. I finished off the eyes with a dot of ivory in the rear corners.
At this point I moved on to gloss coating the sections of the model that were getting decals. The practice I did with the decals on the Invictors really helped as now I feel I can put them on anything. Once the gloss coat dried I used Micro Set to loosen the decal from their backing. Before placing the decal I brushed some of the Micro Set on the surface so that I can immerse the decal and also allow me to slide it around easier. Once it was place I used a cotton swab to absorb the excess and to flatten out the decal so that there weren’t any creases. For the decals on the knee armor I applied some Micro Sol once the Micro Set had evaporated. The curvature of the knee armor causes some small creases in the decal and what Micro Sol does is sort of soften and stretch the decal so it conforms to more irregular shapes.
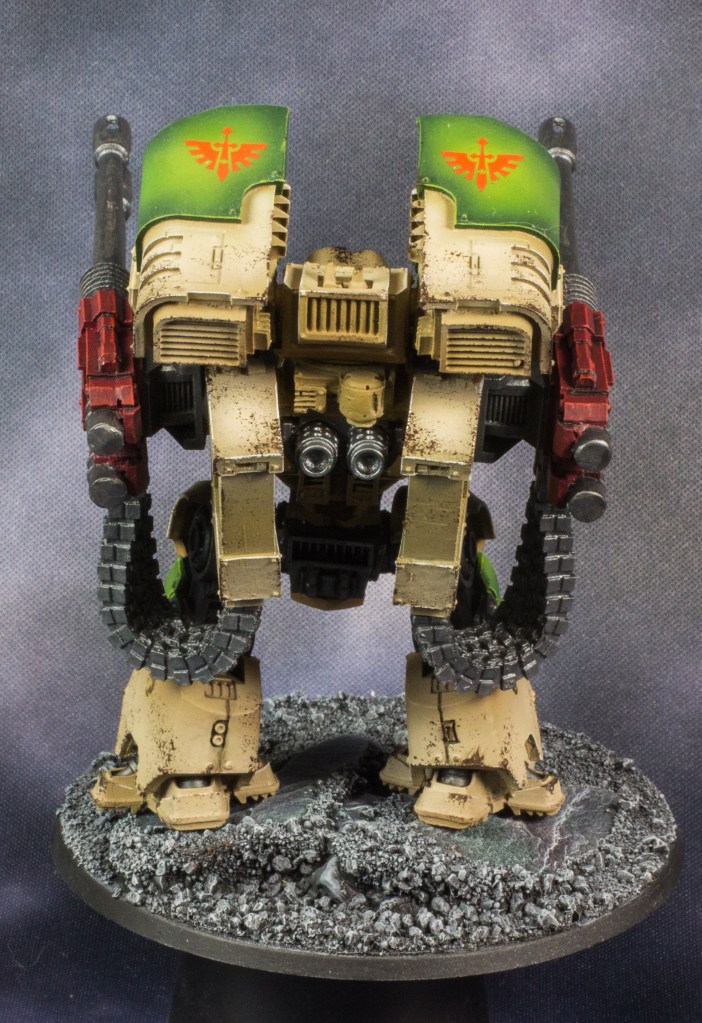
So everything was practically finished so I attached the dreadnought to a resin base I got from Dark Art Miniatures and applied a matte varnish. It was at this point that I realized that it looked really flat because it was mostly smooth bone white armor. I decided against adding more shadow with an airbrush because of overspray and using a brush to glaze in more shadows wouldn’t really fix the problem because I could only really darken the recesses not the wide open panels. So I turned to weathering the armor in order to break up the monotony of the armor and make it more visually interesting.
Since I don’t really do much weathering on my models I opted on using a simple sponge technique this time around. I grabbed a piece of foam sponge from a random Infinity blister and ripped off one of the corners. Using a pair of tweezers I grabbed the piece of sponge and dipped it into some rhinox hide. I then dabbed it on a piece of paper towel to remove excess paint and then dabbed it onto the armor sections. I made sure to hit all the edges followed by random spots on the more open sections of the dreadnought. Looking back on it I could have gone a little harder on certain areas near the head and the top of the legs which is something I might do if I ever revisit the model in the future.
Honestly, the dreadnought ended looking better than I expected considering I haven’t done bone armor before. The targeting lens on the missile launcher looks silly and I definitely need to redo it but today is not that today…tomorrow doesn’t look good either. The weathering really did a good job of breaking up the armor and I might just weather all of my bone armor units from now on because it was just so easy and it produced such a good effect. For future weathering I might take it a step further and use some enamel weathering paints I have from AK Interactive or delve deeper into oil washes. Regardless the Deredeo is finished and I’m happy with how it looks…….but I am going to paint the next one green despite what anyone in my Warhammer group says because that is just a more fun color to paint.
Till next time my wayward compadres.
