

Long before I became a miniature painting enthusiast I have always suffered from gear acquisition syndrome to some degree. As I flit from one hobby to the other in an attempt to find something that fit me I would always acquire the newest shiniest toy in the naïve belief that having it would somehow further my skills or benefit me. Minipainting was no different and throughout my tenure I have acquired a vast array of different products. Not only do I have a fairly sizeable pile of shame, I’m sure we all do, I have also acquired a cavalcade of different paints, brushes, wet palettes, airbrushes, inks, cutters the list goes on and on. As such I have tried out and tested a vast swathe of products that exist for this hobby in the pursuit of what works for me and handled miniatures from a wide variety of manufacturers from across the globe as I build that pile of shame ever higher.
With the times being what they are and hardships that have been happening, I have not been able to paint as frequently as I would like and my contributions to my blog this year has slowed quite a bit. However, I have realized that I don’t have just my skills as a minpainter to offer but my experiences and opinions as well. So in those moments of peace I have when I am on a bus or sitting in a waiting room I might as well collect my thoughts and review all the products I have used or the miniatures I have procured over the years. And I feel there is no better place to start than one of my most recent acquisitions the 75mm Raven Queen by Karol Rudyk, a piece I have had my eye on every since it was released in the summer of 2020.

Considering this is essentially a review, I feel that I should state that the item in question was something I procured myself, on sale admittedly, for my own use. Also, what I’m reviewing isn’t’ the artistic design of the model but rather the casting quality and physical fit of the model. Different designs speak to different people so I can’t comment on that aspect but the quality of a sculpt and it’s casting is something that can be evaluated objectively regardless of the subject matter.
Karol Rudyk Miniatures is a miniatures company that operates out of Poland and produces boutique display miniatures that at the time of writing this are all fantasy themed. As such the products are made in limited batches and cast in resin by hand if I am not mistaken. The particular model I bought was the 75mm Raven Queen that has an MSRP of 75 EURO but I was fortunate enough to get it during a rare sale for a total of 67 EURO which included shipping. Surprisingly it only took a little over two weeks for the package to arrive if I remember correctly, I had assumed it would take much longer and had originally resigned myself to the idea of ‘it will get here when it gets here’ and forgot all about it.
The package was simple and expected, a regular carboard box and inside was a mailer box with a picture of the product in question. Inside that box though lay my prize, nestled among some packing peanuts was an art card, a business card and three plastic baggies containing the Raven Queen herself.
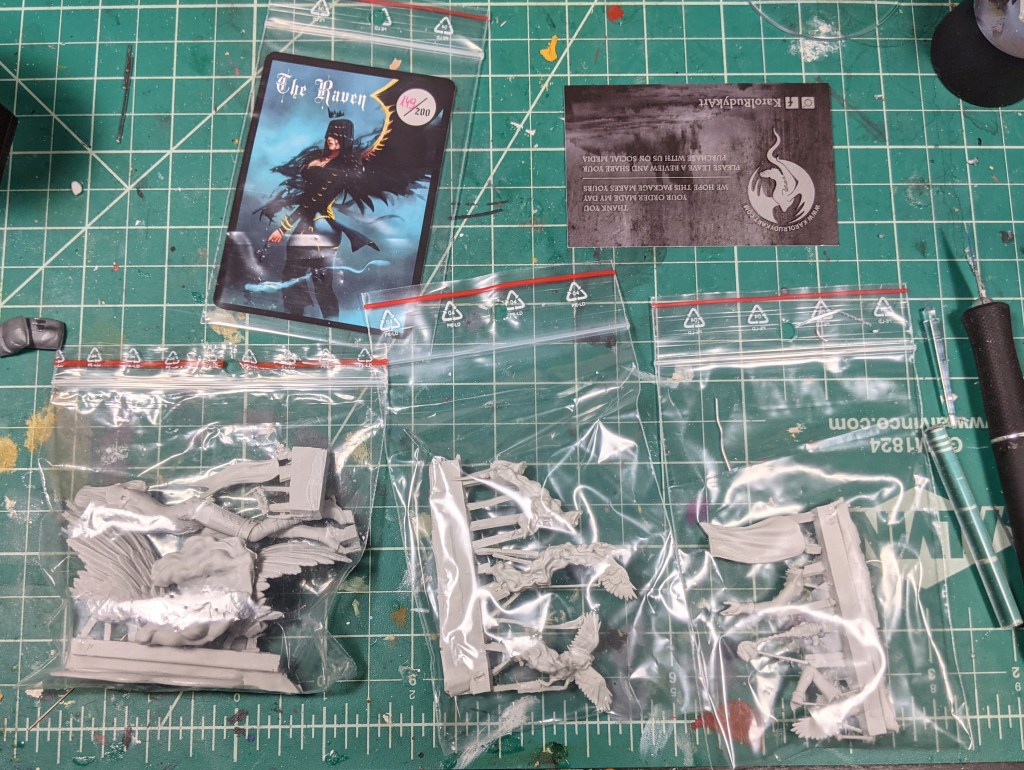
The art card is quite nice because it also has the production number because as I said before these miniatures are made in limited batches and thus it also serves as a sort of certificate of authenticity; mine in particular is #149 of 200.
I opened up all the bags and gave a quick, general inspection of all the pieces to see if there were any major problems. I am happy to say that there weren’t any egregious problems, no terrible mold slips, major bubbling or deformed pieces as far as I could tell, at least nothing reminiscent of failcast or poor Forgeworld models. There was a decent amount of flash though but doesn’t seem to impact any of the details and can be easily cleaned up.
I took a closer look at the main body and face because these would the areas that would draw the most attention. As stated before there were no major problems, but if you look closely at the face you will notice what appears to be a leftover support piece connecting the face to the veil which is an awkward location that would make cleaning up a bit of a chore. There were other support pieces between the legs but those would relatively easy to fix. On her lower back was some excess resin but some scraping with the back of the Xacto knife followed by some sanding fixed that right up. The last thing I noticed was a minor mold slip on the calves of the legs where they both meet. I can scrape away most of it with the Xacto blade but sanding it is difficult because the mold slip is in the valley where the legs meet and thus the sandpaper doesn’t really reach. But since it’s in an area that no one would really look at I won’t kill myself trying to make it look perfect. The last thing I’ll note for the body is that you can tell that the master was a 3d printed model, as evidenced by the print lines you can see on the abdomen. However, in person the lines are small and I am confident that it won’t show once some primer and paint is on it.

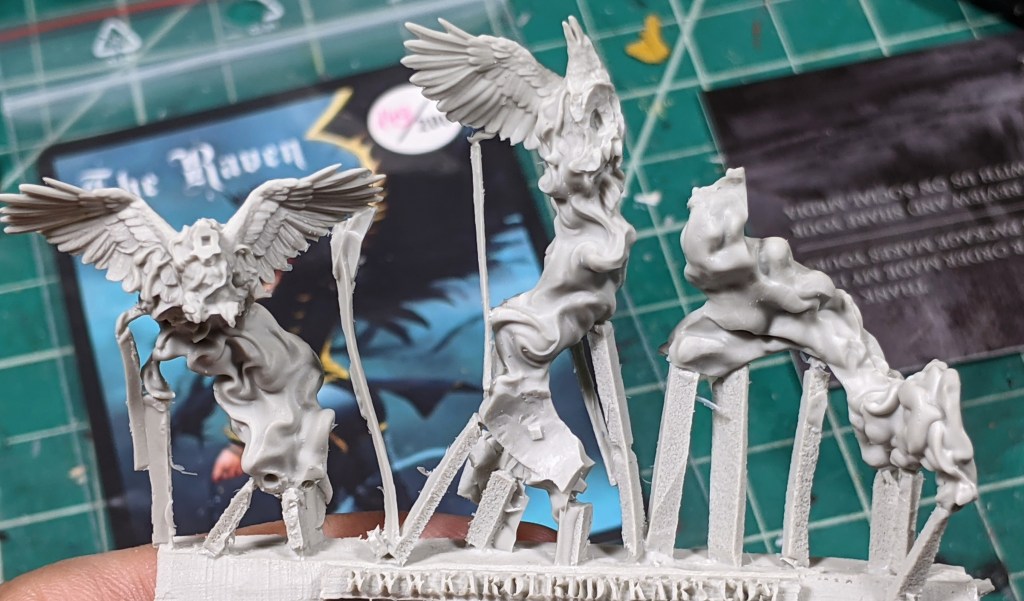
The next largest piece I took a closer look at were the wings which are another major focal point. There isn’t much to say about the wings because they are casted quite well. There is very little flash that needs to be removed and all the details are crisp and pronounced. The only shortcoming is the positioning of the gates on the upper feathers. I will have to be careful removing those gates because they are attached directly feather and I run the risk of losing detail if I am not careful. The lower gates pose no problem because they are attached to the contact point for where they attach to the body so it is not obscuring any feathers or other details. However, I would like to point out that the gate on the upper feathers is there by necessity and I feel that the caster was deliberate with their gate placement so as to preserve as much detail as possible.


Now that the major pieces are out of the way, I examined the smaller pieces such as the smoke and crow details. As expected the details are sharp and crisp just like the larger pieces but not as much flash was present. One can see in the photos that there are what appears to be a fair number of gates but again I feel that their placement is deliberate. You can’t really see it from the photos below but many of gates connect to contact points and thus don’t obscure any details. Other gates that do connect to more detailed areas are slight and appear to be easy to deal with the smoke piece being the only one that may require a bit of sanding work afterwards. There was some very minor bubbles in the top ridge of her left wing as well as a moderate mold slip on the outside section of the longest feather. This will take some careful cleaning to fix and so far is probably the most annoying defect I have encountered.
With the arms, crown and cloth I continue to see the same level of crisp detail and thoughtful gate placement. There is a minor mold slip on the forearms that seems to cross the circular details as well as some minor bubble on the rear of the shoulder. A little more work will have to be done here to clean everything but with a piece like this I think it’s worth the effort and it is usually par for the course for such detailed resin models.


After checking all the pieces for any defects I cut apart the wing and one of the arms to check the fit. Regardless of how good a model may look, it is all for naught if have to basically resculpt a shoulder just to get it to fit right. These initial dry fits were very promising, the arm slotted onto the body with no obvious gaps, a little filling might be needed in order to make it seamless but I don’t think it’s absolutely necessary. The wing took a little bit of doing to get it to fit right because the gate was attached to the contact point. Thus, it was a process of slowly cutting away excess resin in stages and checking the fit in between so that I can get a good fit without accidentally cutting something I shouldn’t have.
As I dry fit the arm and wing for my little test, I noticed something about the model as a whole. Several pieces have some very solid contact points, which you can see on the smoke/crow pieces or the wings. But there are also a few pieces with very small contact points, such as the left hand that holds the brazier or the crown which has a contact point for the head of a crow. This means that overall the model can be a little delicate. This isn’t a negative per say but it is something that should be kept in mind during the assembly and painting process lest you inadvertently break some dainty detail you weren’t paying attention to.
Overall if I had to give this model some sort of rating, I would give a 8 out of 10. The casting is very good with crisp and sharp details even on the feathered wings. There is some minor mold slips on some parts of the model, with the one on the left wing being the most difficult one to fix. Some minor bubbles are present but those are relatively easy to fix with a bit of putty and some sanding. The gates are placed pretty well but still requires a bit of care when snipping them off to make sure that nothing of value is lost. Also, with the gates attached to the contact points a little effort is needed to ensure a good fit is had. So there is a decent amount of work that needs to be done. However, that being said these are fairly minor things when you take into account that these models are casted by hand and a little elbow grease is expected when it comes to these more boutique models to get them ready; ask anyone who’s put together a garage kit and they’ll have some horror stories to tell.
I look forward to the day I put her together and can bring her to life in my own style. Until then I can relish in knowing that I have such a quality model and that the hours spent on her will be well worth it.
